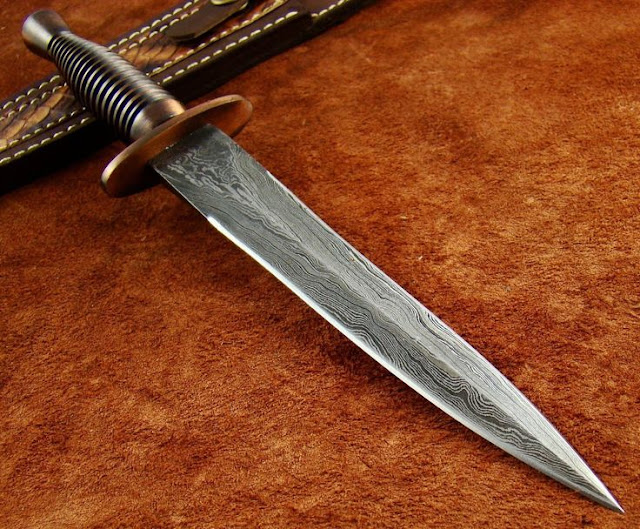
HOW TO ETCH DAMASCUS STEEL

Make sure to wear regular gear when working with acids. Fill in the etches in good airspace and wear gloves, eye protection, and clothing.
damascus steel hunting Knives etching is completed with chloride with ferric or muriatic acid. Before you start, check out the expiry date for your choice of acid to make sure it's too old. Using expired acids creates problems with your etching, and you do not want to get it after you have started your acute too old to work properly.
You will also need to wash a baking bar. Mix baking soda with distilled water, using a lot of cooking soda so you can dip your piece to reduce acids and stop acne action.
Once you're all ready, you're ready to pick up!
HOW TO CONDUCT AND WORK FOR THE WORK
HOW TO CONDUCT AND WORK FOR THE WORK
STEP 1: STARTING
Bring your Damascus at the end of grit 400 to 600. If you use muriatic acid, you can bring Damascus up to 1200 grit, or you can leave it 400 grit. No matter how effective it is. With ferric acid, keep grit between 400 and 600.
Do not change before creativity! Buffing closes steel pores, which will keep the acid from getting it and will end with an unusual etch.
Step 2: Cleaning
Toch in Damascus, it should be completely clean. Wash thoroughly your piece of liquor and view it with pure oils.
Avoid using acetone items because they leave the remainder then disturb the etch, and do not touch the sterile with your hands. Acid reaches well in the cleanest place.
STEP 3: DILUTION
If you are using ferric acid, lift it with a compact juice until you are so close to 50/50 acid ratio for water supply. Never use tap water, spring water, or filtered water - all will cause problems etc. Make sure your remaining distilled water does not last longer than a year.
Asiatic Muriatic does not require dilution.
STEP 4: START ACID
In both uric acid and ferric chloride, the temperature should be between 70 and 100 degrees Fahrenheit, about room temperature.
If you need to warm your acids to be used, the best way to place your acids container is in a large amount of warm water. Never put acid on the microwave!
STEP 5: SUBMERSION
Add your Damascus clip to an acoustic container so that it can be released freely and not touch the sides or bottom of the container.
To make sure that acid is in, you can cast an episode back and out of acid, but mixing is the best way to make sure you get an itch. Using an old dental rubber, dial Drums into acids to help remove any fat or fats that may not be available during cleaning, and remove removal materials as acids do their work.
Let your piece remain in acids for 10 to 15 minutes.
STEP 6: USE
Remove your Damascus piece from acids and throw it to your baking board for 5 minutes to reduce acids.
You can also use Windex with this step, but do not try to break your piece. Earn the Windex deep deep hole so that you can fully fill your Dutch item.
After 5 minutes, rinse your piece of liquor and tie it with the pure rag. You can repeat 5 and 6 steps for a deep etch if you wish.
If you have hidden part of your bacteria so that it does not keep, and you want to do some part of acids and baking soda, completely remove the mask, clean the blade, and then use your mask before the second etch. Removing this step is notified, even though your tailor seems good because the acid is in the middle of the second and eliminates your design.
STEP 7: BUSINESS
Since damascus steel hunting Knives has no defect, one of the components inside the steel is not affected by etching, which makes it unacceptable Damascus to be a unique discovery when it's over. Use the finishing sandpaper to tighten the top of the slightly raised steel, and the other metal will remain dark and healthy, giving you the best difference.
If you choose, you can finish with the 2000 grit buffing compound and the soft wheel to shine on your Damascus clip, but you will lose some of the difference between metal components. Play both the process and the sandpaper to see what you like. If you decide that you want to reverse one another, you can also make a quick frame by placing your teaspoon refined in acid for a few minutes and then entering a baking soda.
Some manufacturers like to roll and cut the pieces into the WD-40 to get the darkest difference. This goes with us, but it produces remarkable visibility, and it's good to fix your pieces of photos.

Pretty much unreadable due to very poor English. For example: "You can also use Windex with this step, but do not try to break your piece. Earn the Windex deep deep hole so that you can fully fill your Dutch item."
ReplyDelete